Showing posts with label crafts. Show all posts

Friday, April 24, 2009

For the Birds


Stop taking pictures of me, seriously!


You are so annoying, Mom!


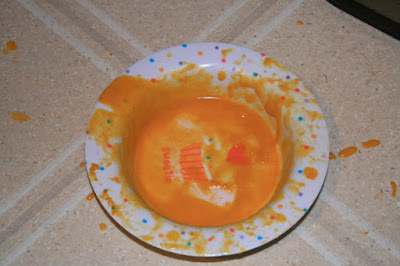
The bowl winds up on the floor.

Can't you just tell how annoyed she is with me? When I first saw the first picture, I had to do a double take because I thought she was flipping me the bird! Speaking of birds (nice segue way, huh?) I bought these adorable little ones at Joanne's for only $2 each! They were having a 40% of sale and I just had to have them.


Spencer's MiMi's birthday was yesterday and we are celebrating this weekend. I painted this silhouette of Spencer for her. Remember, I am NO artist any way shape or form, but I think it turned out pretty good!


On the throwing up status, she has already puked once this morning. After 20 minutes of her screaming her head off following said puke, I had to go to her. I just wiped her face and calmed her down and she fell asleep. I didn't talk to her or anything, but I guess I already broke the rules. I really don't think the doctor thought she would cry for that long though, 20 minutes of hysterical sobbing- a mother can only take so much!

Spencer's play ground (a swing and slide) is being put up this weekend and I am SO excited for that. Does anyone have any cool weekend plans? I've heard that it's going to be beautiful almost everywhere across the country for the next few days! I hope everyone has a great weekend!

post signature

Saturday, April 11, 2009

The Easter Tree

So I finally finished our Easter tree!


It was not the easiest of projects and a it took me awhile to get it all done. Micha has a great tutorial about how to do this on her blog, so I'll only briefly tell you what I did to create such a masterpiece! (kidding!!)

I blew out the eggs and microwaved the shells for 20 seconds. I cracked two shells when I dropped my eggs on the floor because they were H-O-T!


Next, I painted the base coats and let them dry. They needed at least 3-4 coats, and some needed as many as 8-9, to make the finish un-streaky and even. Then I painted on the designs- I think it's pretty obvious that I didn't use a stencil, I am no artist!


After all the eggs had dried, I sprayed them with a shine finish and let them dry some more. So much of this project was waiting for the paint to dry. I spray painted some branches white while I was waiting on my eggs.

I then threaded a pearl with some really narrow ribbon, tied a bow, and used a hot glue gun to attach it the egg. I got my hot glue gun for $2.99 at Ben Franklin.


I had a little trouble figuring out how I was going to arrange it- but I just played around with it until it looked right to me. I put some daffodils in and tied a bow around my vase, and voila! My first Easter tree.


Micha also gave me the idea to do just a few eggs this year and next year we can add to it and Spencer can help. But I'm kinda liking my little tree, even though I would have had an easier time wring a 20 page paper!

I hope everyone has a great Easter weekend!


post signature

Friday, April 3, 2009

Egg Blower

I have spent the better part of my free time today blowing out eggs. Doesn't that just sound gross? But I saw this super cute craft idea on Anne's blog, and I really wanted to try it out. It's probably going to take me a few more days to finish it all, so I'll post all the pictures when I'm done with the whole thing.


This weekend we're going to the PGP's house and spending Saturday night. They bought Spencer a play ground for Christmas and I think we are going to start putting it up this weekend! Yippee, energy burning apparatus right in the backyard!


I think my Spring Cleaning "activity" for Sunday will be re-lining my chest of drawers with this new liner I got for Christmas. Okay, so it's not exactly new anymore, but so what!? It's a brown suede drawer liner that I got from the Container Store. Speaking of which, I love that store! It makes me want to organize my entire life.


I hope everyone has a FANTASTIC weekend!


post signature

Wednesday, March 25, 2009

Katie-Home-Maker

On Saturday, I went to the grand opening of a local JoAnne's because I had a 40% off coupon. It was a crazy madhouse in there. They even had one of those machines that gives you a number, like at the DMV or deli counter, for the "cutting counter."

I only bought a few yards of fabric, but I was really excited to make something. I hadn't used my sewing machine in awhile, since before Spencer was born, but I contemplated getting it out of the box and setting it up. I decided against it when and I thought about all the potential Spencer disasters that could happen.

I need one of those stands where the sewing machine folds into the table itself- I think that would be the most childproof. So anyway, there I was with my new fabric and no sewing machine. I decided to be brave and work on my hand stitching.

With the exception of a few hems, a few buttons, and a few holes, I hadn't sewn anything by hand in a long time. I thought I'd go the easy route and just make a simple pillow, enough to re-hone my mediocre sewing skills. The beginning stitches were a bit messy and uneven, but I eventually found a groove and it was pretty easy from there.

The hardest part of the entire process was stuffing the pillow! Ugh! Next time I'll just use a pillow form, because I lack the skill in making it evenly fluffy. Besides using a pillow form, does anyone have any good suggestions on how to properly stuff a pillow? I'm all ears.


Here is a picture of my sewn-by-hand, (how bratty does that sound!) pillow! I'm not brave enough to tackle piping, cording or ruffling without a sewing machine, so the boring edges will just have to do for now.

Friday, February 20, 2009

A Week Late, But Love is Never Out of Style

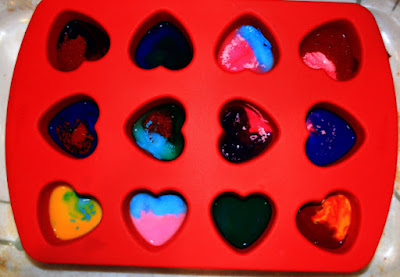
I'd seen this craft done on a few other blogs in different ways, so I thought I'd give it a whirl! I bought a silicone mini heart tray and some crayons- tray $8 and 64 Crayola Crayons for $1.75. (I had a coupon at Target)

I broke up the crayons and put them in the mold. I had never done this before, so I wasn't sure how many crayons to put in each one or which colors would go well together, so this was a good experiment for future endeavors. I've done it twice since then, and I think it's best to put the equivilent of 1 broken crayon into each mold- maybe a tad less than one, like 7/8ths, haha.

I put them in the oven on 350 degrees and sat there and watched them melt. I wasn't sure how long it would take, so I wanted to be careful and make sure I didn't end up with a boiling waxy mess. I didn't stir them or anything, I just let the heat do it's job, and it took about 5-7 minutes for them to turn into liquid.

I took them out to let them set- about 15-20 minutes- and then popped them out! They came out really easily and hardly left any residue in the tray.


I think they turned out really well for my first batch! I discovered that it's best not to mix dark colors together, like blue and green- unless one of them is very light. Spencer really likes them and they are a lot easier for her to hold than regular crayons.


Up close and personal with the heart crayons! All in all, this was probably the easiest craft I have ever done and it's also the one that turned out the best- at least in my opinion. And you could do it with any mold, for any holiday or birthday- I can't wait to make four leaf clovers for St. Patrick's Day!